Welcome back to All About Jewelry Making! There are so many important factors to cover with regard to jewellery basics that I thought it best to break it up into smaller chunks. With a little bit of practice, you too will soon be able to make your own stunning pieces in a matter of minutes!
Earrings
Size and weight need to be considered, but apart from that, anything goes. There are findings to attach any type of bead or pendant to any type of ear wire. Don’t despair if your ears aren’t pierced, clip-ons or screw-ons are used in exactly the same way as pierced earring findings.
Earrings Featuring Pendants
Some pendants can be joined directly to the earring wire. Others need additional findings.
- a) Pendants with holes which run from front to back hang directly on to the earwire.
- b) With holes that run from side to side, a jump ring is needed.
- c) Holes that run from front to back but are too deep for the earwire loop need two jump rings or a bail and loop. These two findings can also be used to give your earrings a bit of extra ‘swing’

Earrings Featuring Beads
A simple earring is created by threading your choice of beads onto a headpin. An important factor is the size of the hole in the most prominent bead. If the hole is a little too large to fit on the headpin a plain small cup at the base will ensure your bead does not slip off. If the hole is very large (2mm or over) you will need a small bead at top and bottom of your feature bead.
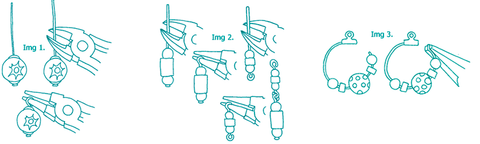
Cut the headpin leaving a generous centimetre. Bend the pin directly above the bead at a right angle and then curl the top of the pin into a loop with the round-nosed pliers. Your first attempts may appear a little untidy, this is perfectly normal. What is important is that the loop is closed. If necessary make a small overlap. The loop can then be attached to an earwire (img 1.)
By joining a headpin and eyepin you can create a long and flexible earring, an earring with maximum ‘swing’! It is not important with beads on headpins and eyepins which way the loops are formed, as the beads don’t have a definite front or back (img 2.)
Hanging hoops enable you to arrange your beads in a circle. Fill the hoop completely or choose a few select beads. As with the chokers, on page 4, it is best to use an odd number of beads. Open the hoop and add your beads. With the flat-nosed pliers bend the tip of the hoop slightly upwards before replacing it in the slot at the top (img 3.)
Earrings Featuring Beads and Pendants
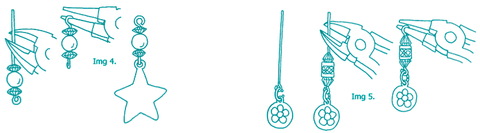
A pendant set off by beads on an eyepin is an attractive design feature. Start by threading your choice of beads onto the eyepin. Be careful to make your loop at a right angle to the existing eyepin loop. In this way the pendant will hang correctly, along the line of your ear for all to admire! (img 4.)
Where the pendant hole is too deep to attach comfortably to the loop on your eyepin, a jump ring comes in handy. In this situation turn the loop on your eyepin in the same direction as the existing loop (img 5.)
Ear wires

Long ballwires - For pierced ears, the most popular earwires are long ballwires. To attach your pendant and/or beads, the loop at the bottom is easily opened. Round-nosed pliers are best because they will not bend the earwire’s loop out of shape.
Kidney wires are formed to close once in the ear. They have a partly formed loop onto which you attach your pendant and/or beads. Squeeze the sides of this loop together to secure.
A stud and hook are suitable for a shorter and daintier style of earring. The loop is easily opened and closed with a pair of round-nosed pliers. A scroll back (or butterfly) is needed to hold the stud in place in your ear.
Clip-on or screw-on - Those without pierced ears have a choice of clip-on or screw-on earring findings. Jump rings are useful additions and help your pendants and/or beads to hang freely.
Flat-backed findings are designed so that various pendants can be stuck to them. Choose pendants that have discreet holes and at least one side flat. Use an epoxy resin to stick the flat-backed item onto your stud. Always follow the instructions on the glue packet.
--------

***